PC building
Guide PC assembly guide
Required equipment:
-
Screwdriver with a Philips 2 bit (PH 2)
-
Computer parts for assembly
-
Central processing unit (CPU)
-
Motherboard with compatible CPU socket and firmware
-
Random access memory (RAM)
-
Power supply (PSU)
-
Case (That supports motherboard)
-
CPU cooler (if thermal paste is not included you also need to acquire some)
-
Storage (Solid state storage is preferred as primary boot partition)
-
ESD safe work mat (Preferred not absolutely necessary)
-
Temporary storage for screws (Bowl, cup or magnetic tray)
When starting a PC build the first thing you need to do is clear some space to work so that the work becomes easier and the chances for damaging the computer or the surrounding things while you build.
Start with taking the motherboard out of its box, if you do not have an ESD safe mat you should place the motherboard on top of the ESD safe bag the motherboard comes inside.
The order you add your components is somewhat important and can be divided into 3 groups, The pre- case assembly, the case assembly and the wiring.
The first components to install is the processor, ram, cooler and M.2 SSD (if you have one), then prepare the case to place the motherboard inside.
If the case is small it might be smart to put the motherboard in first but if it is a normal size case you can get the PSU and depending on if it is modular, semi-modular or non- modular you connect the required cables often being the Motherboard power cable which has the most plugs and the the 4-6 pin cpu connetor. If you have a GPU you also need the correct power cable for this if your GPU is very modern it might have a 12V power connector or if this seems wrong it might have 1 or 2 normal 6-8 pin power connectors. Use the correct connector and if you use the 12 V power connector be 100% sure that the entire plug is fully connected, loose connectors can and have caused fire inside of pc's.
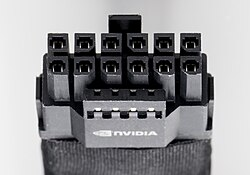
Image credit: By Jacek Halicki - Own work, CC BY-SA 4.0, https://commons.wikimedia.org/w/index.php?curid=135703903
Depending on if you have any non NVME drives you should connect your sata power connectors aswell.
When you have all these cables connected to the psu precede by mounting the psu before plunging the cables into any parts. When the psu mounted connect the motherboard and cpu cables to the motherboard, the cpu power plug is often at the top for the motherboard close to the cpu and the motherboard power connector is often on the right side of the motherboard. Preceed by installing any drives into the drive bays in the computer or if there are no drivebays you can either 3d print some or just use doublesided tape( do not mount the tape to the circuit board on the drive!!! ), these give the most safetey for your drives which is critical for HDD's, these methods are ranked from best to worst in the order they were mentioned. Sata ssd's are fine with doublesided tape. Then find the motherboard manual and connect the correct front panel headers and usb headers to the case. Last before closing the computer is connecting the graphics card. Remove the PCIe bracket slot covers for the spot the GPU will occupy and when installing make sure the metal plate on the gpu does not scratch the motherboard which can damage the motherboard if done carelessly.
Connect the GPU power connector, and if everything is done correctly you should have a fully built computer.